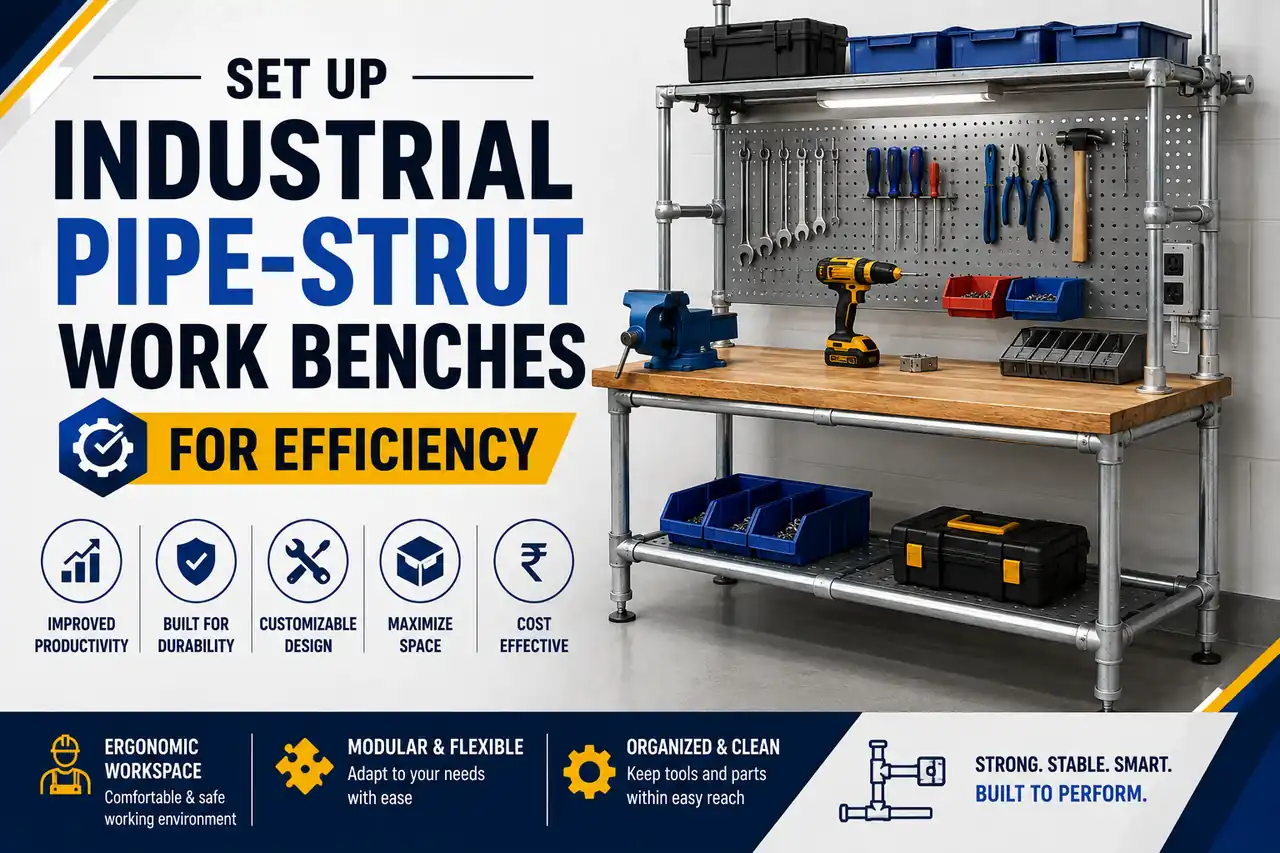
A pipe-strut work bench is a modular bench built from metal pipes and joints. To set it up for maximum efficiency, plan your space first, assemble a stable frame, fit the right work surface, and keep your most-used tools within arm's reach. Good lighting, tidy cables, and clear storage zones cut wasted movement and boost daily output.
A messy, wobbly work bench slows down every job. Workers waste time reaching for tools. Parts pile up in the wrong spots. Over a week, those small delays add up to real money lost.
Pipe-strut work benches fix this. They are simple, strong, and easy to change. You can build them to fit your exact work. And you can rebuild them when your needs shift.
Featured Products

This guide walks you through the whole process. You will learn what these benches are, how to plan a setup, and how to build one step by step. You will also learn how to make it safe and how to keep it working for years. Let's get started.
What are industrial pipe-strut work benches?
A pipe-strut work bench is a modular bench. It is built from metal pipes and special joints. You slot the pipes into connectors to form the frame. Then you add a top surface and accessories.
The pipes are often steel or steel-plastic composite. The joints clamp onto the pipes and hold them in place. No welding is needed. You just cut, connect, and tighten.
Why does efficiency matter so much here? Because your bench is where the work happens. A well-planned bench saves seconds on every task. Those seconds turn into hours over a month. In a busy factory, that means higher output and lower costs.
Proper setup also saves money in other ways. It cuts the risk of injury. It reduces damaged parts. And it lowers the need for repairs. A little planning now pays off for a long time.
Understanding pipe-strut work benches
What are the basic components and materials?
A pipe-strut bench uses a few key parts. Here are the main ones:
- Pipes: These form the frame. They are usually steel or coated composite pipes.
- Joints and connectors: These link the pipes together. They clamp tight and hold the shape.
- Work surface: This is the top. It can be wood, laminate, or an anti-static mat.
- Foot cups: These sit under the legs. They keep the bench level and steady.
- Accessories: These include tool racks, lights, power strips, hooks, and drawers.
Many benches use a steel-plastic composite pipe. This type resists rust. It can also be anti-static, which protects sensitive electronics.
How do they differ from standard work benches?
A standard bench is often fixed. Once it is welded or bolted, it stays that way. Changing it is hard.
A pipe-strut bench is different. It is modular. You can add a shelf today and move it tomorrow. You can raise the height for a taller worker. You can bolt on a new tool rack in minutes.
This flexibility is the big win. Your work changes over time. A pipe-strut bench changes with it.
What are the common uses across industries?
These benches show up in many places. Here are some common uses:
- Assembly plants: Workers build products at fitted stations.
- Production workshops: Teams run daily tasks at custom benches.
- Maintenance bays: Staff repair machines on strong platforms.
- Labs and electronics: Anti-static tops protect delicate parts.
- Warehouses: Packing and sorting benches speed up shipping.
Suppliers on IndiaMART and TradeIndia list many models. Prices in India often range from around ₹10,999 for a light-duty bench to ₹29,500 for a heavier one. Aluminium extrusion benches can cost ₹90,000 or more. So there is an option for most budgets.
How do you plan a pipe-strut work bench setup?
Good planning comes before any building. Rush this step and you will regret it later.
Assess your workspace and available space
Start with your room. Measure the floor space you have. Note where the power points are. Check the height of the ceiling and any shelves above.
Leave room to walk around the bench. A worker needs space to move freely. A cramped bench slows everything down.
Determine your workflow requirements
Think about the actual work. What tasks happen at this bench? What tools does each task need? How do parts move in and out?
Map the flow from start to finish. Parts should move in one smooth direction. This cuts wasted steps.
Consider safety and ergonomic needs
Set the bench height to fit the worker. A good height stops back and neck pain. For standing work, the top should sit near elbow height.
Plan for anti-slip surfaces and rounded corners. These small choices lower the risk of injury. Comfortable workers also stay productive for longer.
Step-by-step setup guide
Now for the fun part. Here is how to build your bench, step by step.
Step 1: Gather your tools and materials
Collect everything first. You will need pipes, joints, a work surface, foot cups, and your accessories. You will also need a pipe cutter, a spanner, and a measuring tape.
Lay it all out on a flat, clean floor. This makes the build faster and easier.
Step 2: Assemble the frame
Measure and cut your pipes to size. Mark the cut points with a pen first. Then use a pipe cutter for a clean, straight cut. Remove any rough edges after cutting.
Attach the joints to the pipes. Build the frame one section at a time. Keep it symmetrical, left to right. Assemble on a flat surface so the frame does not twist.
Step 3: Install the work surface and accessories
Cut the top board to fit your frame. Then fix it firmly in place. Make sure it sits flat and does not rock.
Now add your accessories. Fit tool racks, hooks, and a power strip. Add lights above the work area. Place each item where it makes sense for the task.
Step 4: Add storage solutions
Storage keeps the bench clear. Add drawers for small parts. Fit shelves for larger items. Use bins for loose components.
Group items by how often you use them. Frequent items go close. Rare items go further away.
Step 5: Test stability and safety
Give the bench a firm push. It should not wobble. Adjust the foot cups until it stands level and solid.
Load it with a normal weight. Check that nothing shifts. Only start work once you are sure it is safe.
How do you optimise a work bench for maximum efficiency?
A built bench is only the start. Now you fine-tune it for speed.
- Keep tools within arm's reach. The most-used tools should sit closest. This stops needless stretching and walking.
- Use good lighting. Bright, even light helps you see fine detail. It also reduces eye strain and mistakes.
- Manage your cables. Loose cables trip people and clutter the top. Use clips and trays to keep them tidy.
- Create clear storage zones. Give each type of item its own home. A place for everything means less searching.
- Follow the "golden zone" rule. The space right in front of you is prime real estate. Save it for daily jobs, not clutter.
Small tweaks like these have a big effect. Together, they can cut wasted movement across a full shift.
What safety considerations matter most?
Safety is not optional. A strong, safe bench protects your team.
Know your weight capacity
Every bench has a load limit. Heavy-duty industrial benches can hold up to around 5,000 lb (2,270 kg). Lighter benches hold far less. Never guess. Check the rated limit and stay well under it.
Anchor and stabilise the bench
A tall bench can tip if it is not stable. Use level foot cups on solid ground. For very tall units, anchor the bench to the wall or floor.
Run regular maintenance checks
Loose joints get worse over time. Check the clamps and bolts often. Tighten anything that has slipped. A five-minute check can prevent a big failure.
Follow worker safety rules
Train your team on safe use. Keep the floor around the bench clear. Provide the right protective gear. Simple habits keep everyone safe.
What are the most common mistakes to avoid?
Many setups fail for the same reasons. Watch out for these:
- Overloading the bench. Too much weight bends the frame and risks collapse.
- Poor organisation. A messy top wastes time and hides tools.
- Ignoring ergonomics. The wrong height causes pain and lowers output.
- Weak lighting. Dim light leads to errors and eye strain.
- Skipping maintenance. Small faults grow into costly failures.
Avoid these five and you are most of the way to a great bench.
Real-world examples of efficiency gains
A little context helps. Here are three common wins.
Manufacturing facility. A plant fitted modular benches with tool racks and clear zones. Workers stopped hunting for tools. Assembly times dropped, and daily output rose.
Maintenance shop. A repair bay switched to height-adjustable pipe benches. Technicians worked at the right height for each job. Fatigue fell and repairs got faster.
Assembly line. A team laid out benches to match part flow. Parts moved in one direction with no backtracking. The line ran smoother and cut idle time.
For more ideas on choosing the right gear for tasks like these, see this guide on choosing the best power tools for industrial work.
How do you maintain a pipe-strut bench for the long term?
A good bench can last for years. Simple care keeps it that way.
- Clean and inspect often. Wipe down the top after each shift. Look for rust, cracks, or loose parts.
- Replace worn parts early. Swap out a bent pipe or a cracked joint fast. One weak part puts strain on the rest.
- Make cost-effective upgrades. Add a new shelf or a better light as needs change. You do not have to rebuild the whole bench.
Because the bench is modular, upgrades are cheap and quick. That is a huge long-term saving.
For a wider look at picking quality gear, this guide on selecting industrial engineering supplies is a helpful read.
Build a smarter bench, one step at a time
A well-set pipe-strut bench does more than hold your tools. It shapes how your whole day flows. Plan your space, build a stable frame, and keep your tools close. Add good light, tidy cables, and clear storage. Then check it often for safety.
These steps are simple. But together they save time, cut costs, and keep your team safe. The long-term payoff is real and lasting.
Ready to start? Pick one bench on your floor today. Apply the steps in this guide. Then measure the difference for yourself. Small changes add up fast.
Frequently asked questions
What is a pipe-strut work bench made of?
A pipe-strut work bench is made of metal pipes and clamp-style joints. The pipes are often steel or steel-plastic composite. The top can be wood, laminate, or an anti-static mat. No welding is needed, as the joints clamp the pipes together.
How much does an industrial pipe work bench cost in India?
Prices vary by size and duty. On IndiaMART and TradeIndia, light-duty pipe benches often start around ₹10,999. Standard steel benches sit near ₹12,000 to ₹29,500. Aluminium extrusion models can cost ₹90,000 or more.
How much weight can a pipe-strut work bench hold?
It depends on the design. Light-duty benches hold modest loads. Heavy-duty industrial benches can hold up to around 5,000 lb (2,270 kg). Always check the maker's rated limit and stay below it.
Are pipe-strut benches better than fixed steel benches?
Choose a pipe-strut bench if you need flexibility. It is easy to change, extend, and repair. Choose a fixed welded bench if your task never changes and you want a permanent unit. For most growing workshops, the modular option wins.
How long does it take to set up a pipe-strut work bench?
A basic bench can go together in a few hours. The build itself is quick because the joints clamp on with hand tools. Most of your time goes into planning the layout and cutting the pipes to size.
How do I make my work bench more ergonomic?
Set the top near elbow height for standing work. Keep daily tools within arm's reach. Add bright, even lighting. Use anti-fatigue mats for standing tasks. These small changes reduce strain and keep workers comfortable.